Part of Speech Tagging
Depending on the language of your transcripts, you may be able to tag each word with its part of speech (Noun, Verb, Adjective, etc.) using the Stanford POS Tagger.
The Stanford POS Tagger has models for:
- Arabic
- Chinese
- English
- French
- German
- Spanish
The steps for POS tagging your corpus are:
- Install the Layer Manager
- Configure a POS layer
Install the Layer Manager
- In LaBB-CAT, select the layer managers option on the menu at the top.
- At the bottom, follow the link labelled: List of layer managers that are not yet installed.
- Find the StanfordPosTagger layer manager in the list, and press its Install button, then Install again.
You will see a configuration page with some information about the tagger. - Press Configure.
You will see a progress bar while the layer manager downloads the Stanford POS Tagger files.
Once it’s finished, you’ll see a further information page.
Create a POS layer
Now the layer manager is installed, we need to create a layer that is configured to use it to tag words with their part of speech…
- Select word layers on the menu at the top.
- You will see a list of word tag layers that have already been configured. The column headings at the top are also a form for creating a new layer, so we’ll fill in that form now.
- Fill in the following details on the form at the top:
- Layer ID:
pos - Type: Text
- Alignment: Intervals
NB it’s important that this is not set to None because a single word can have multiple POS tags, one after another, which are strung between the start and the end of the word token. - Manager: Stanford POS Tagger
- Generate: Always
- Project: This can be left as the default value, unless you want to add the layer to a category of your choice.
- Layer ID:
- Press New
You will see the layer configuration form. Mostly you can leave the default values as they are. - Set the Model to use setting to something that makes sense for your transcripts, which depends on their language. This is a setting you may experiment with to get the best results. For English recordings, you may find the english-bidirectional-distsim.tagger is slower but produces better results.
- Press Set Parameters.
- Now press Regenerate to run the POS tagger on your whole corpus.
You will see a progress bar while the transcripts are being tagged. - Once it’s complete, select the transcripts option on the menu, and click the first transcript in the list.
- Tick the new pos layer to display the tags.
You will see that each word has one or more tags above it - these identify the parts of speech or syntactic categories of the words.

The tags can be searched, extracted, summarised, etc. just like any other annotations.
Summarising POS Tags
One possible aggregated analysis might be to compute the distributions of POS tags for each speaker.
In order to do that, you would set up the tagger as above to output the POS tags, and then set up a Frequency Layer Manager layer with the POS tags as input. In order to do that:
- In LaBB-CAT, select the word layers menu option.
- Add a new word layer with the following characteristics:
- Layer ID:
posFrequency - Type: Number
- Alignment: None
- Manager: Frequency Layer Manager
- Generate: Always
- Layer ID:
- Press New.
You will see the Frequency Layer Manager configuration form. - Configure the layer as follows:
- Summary: Raw Count
- Layer to Summarize: pos (i.e. the POS layer we created earlier)
- Scope of Summary: Speaker
The rest of the settings can be left with their defaults, except: - Annotate Tokens: unticked - we only want the summary information.
- Press Save.
- Press Regenerate to analyse your corpus.
You’ll see a progress bar while each POS label is counted for each participant. - Once the layer manager is finished, select layer managers on the menu.
- Find the Frequency Layer Manager in the list, and press its Extensions button.
This will show a page that lets you select from ‘dictionaries’ that are named after layers managed by the Frequency Layer Manager. - Select posFrequency and press Select
A form is displayed that allows you to perform various operations on the frequency lists you have generated. Most likely, you just want to export a list of frequencies for a speaker: - Under Scope, select a speaker.
Or if you want to include all speakers, select the [all scopes] option at the bottom of the dropdown box options. - Press the Export button at the bottom.
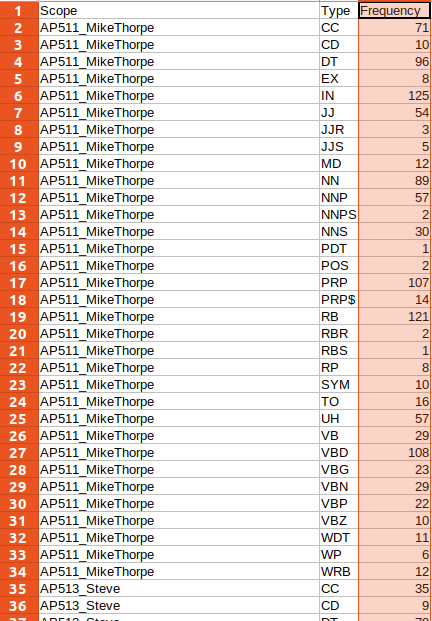
This will give you a CSV file. If you open this in Excel (or any other data analysis tool), you’ll see that it contains three columns:- Scope - the speaker name
- Type - the POS label
- Frequency - the number of times that speaker uttered a word with that POS label
If you prefer to have POS counts by transcript instead of by speaker, you can select Transcript as the scope at step 4 above. If you want both of these, create two word layers, one for summarising by participant, and the other by transcript.